CHDK for the Canon S5 IS has finally been succesfully ported! Users of the Canon S5 IS can now enjoy the features provided by CHDK namely 'modified' aperture, shutter speed and most importantly, RAW support!
Since I own a Canon S5 IS, naturally I would want CHDK! But alas, the path to CHDK wasn't that easy as I use a 8Gb SDHC card to store my photos. I believe there are S5 users out there who uses 8Gb cards for their S5 too, so I decided to write a step-by-step guide for these users to get CHDK to work on their 8Gb (or larger) SDHC's.
** Take note! Use this tutorial ONLY if you want to use SD/SDHC that are LARGER THAN 2GB! In other words, if your card is smaller than 2GB, you can use the default method highlighted in CHDKwiki. If you're wondering why, then I have a brief explanation below.**
** Although this method works, there are major DRAWBACKS to my method! Please UNDERSTAND THE DRAWBACKS before proceeding. If the mentioned issues does not effect you in anyway, then by all means roll on. **
Why all the fuss?
What I've learned is that CHDK can only be loaded in cards that are formatted in FAT12/FAT16. FAT12/FAT16 cards can only be formatted in a maximum size of 2Gb. In order to format cards in size larger than 2Gb, you will need to use FAT32, and CHDK won't load in FAT32 formatted cards. So, in order for CHDK to load AND use storage larger than 2Gb to store your photos, you need to partition the card into 2, and format these 2 partition with FAT12/FAT16 and FAT32 separately. FAT12/FAT16 for CHDK, and FAT32 for photo storage.
Drawbacks
After you are done with everything, you start up your camera and woot! CHDK baby! So you go along shooting photos.. in RAW. So you come home, plug in the card and you see 2 volumes under 'Hard Disk Drives' in MyComputer. One is the FAT12/FAT16 drive used to loadup CHDK; and another is FAT32 drive where all your photos are stored. After reviewing the photos, you say to yourself "Cool, I'll show these photos to my collegues tomorrow at work!"
Tomorrow comes, and you bring along your SD/SDHC to office, asks everyone to gather aorund your workstation and plug in your card. BUT, to your horror, you can't see the drive where your photos are stored! You can only see the FAT12/FAT16 drive in 'removable storage' under MyComputer. WTF!?
Why is that? Well, Windows can only read 1 partition from removable storage. Since our card has 2 partitions (one FAT12/FAT16, one FAT32), windows only read the first partition which is the DAT12/FAT16 partition. The other partition is left 'untouched'.
You ask:" But I can see it in my computer at home! (which you used to partition the card)" Well, you can see it because there is one step below that installs a custom driver which makes your card/cardreader a fixed drive. So all partitions are shown in Windows.
Bottom line is, use this only if the following applies:
- You only transfer files in your own computer (the one where you installed the custom driver).
- You can install the custom driver in whichever computer you work in. (e.g. you need to transfer files in office computer, so install the custom driver there).
Well, yeah it's not perfect yet. I think DataGhost or someone from the CHDK forums may come up with a fix for this. =D But until then, those are the only options we have... at least to my knowledge.
Things to do before we begin:
1) Head to CHDK wiki to read up the basic steps and info. If you are a technical person, then head over to the CHDK Card forum to do some read up. Don't worry if you don't understand the technicalities, that is what this tutorial is for ;) So after getting a rough idea, come back here for further instructions.
2) CLEAN UP YOUR SD/SDHC!! You will be needing to partition/format your card, so move out any photos or data that you need. Dun come crying to me when you forgot to backup your daughter's 6th birthday pics. =P
3) Plan your time. The whole process is going to take around 45~60 minutes. With a lot of steps. I will do my best to describe each step as detail as possible, but you might not get certain steps correct at first try. So make sure you are sober and have plenty time.
4) Pay attention to steps that I highlight in red, those are more important steps.
After all the preparation, you can start your journey to CHDK. Here goes!
** Note that I do not take credit for most of the CHDK related stuff. This tutorial is a compilation of works that I found on the internet, and I will provide a link to the original resources, so all credit goes to their respective creaters/owners. **
Here are the major steps that are needed for CHDK to work on your high capacity SDHCs:
Step 1. Ascertain the firmware version of your Canon S5 IS
Step 2. Download the correct CHDK version and Tools
Step 3. Make our card into a 'fixed disk' for partitioning
Step 4. Partition card
Step 5. Make card bootable
Step 6. Voila! CHDK on high capacity SD/SDHCs!
Appendix A: Todo
Appendix B: Credits!
Step 1: Ascertain the firmware version of your Canon S5 IS
There are two different versions of firmware used by Canon S5 IS in the market, and you need the right version of CHDK to work. These two Canon S5 IS versions are:
1) 1.01a
2) 1.01b
So how do you go about finding out the version of your firmware? It's pretty easy, read up how to get firmware version. Below are the steps I took (each step is followed by a picture to illustrate the steps):
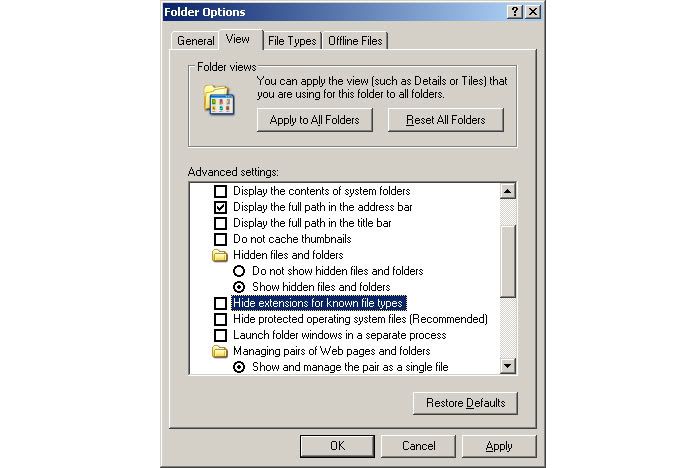
1) Open up 'My Computer' and go to Tools>Folder Options

2) Go to the 'View' tab, and find the entry 'Hide extensions for known file types'. Uncheck it.
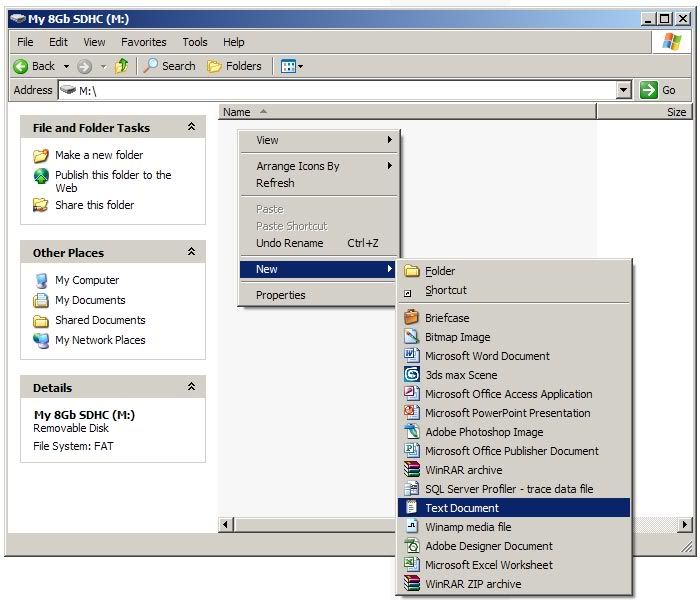
3) Plug your card into a card reader. After your pc detects the card, it will be assigned with a drive letter.

4) Use 'My Computer' to navigate into your SDHC, right click and select New > Text Document.
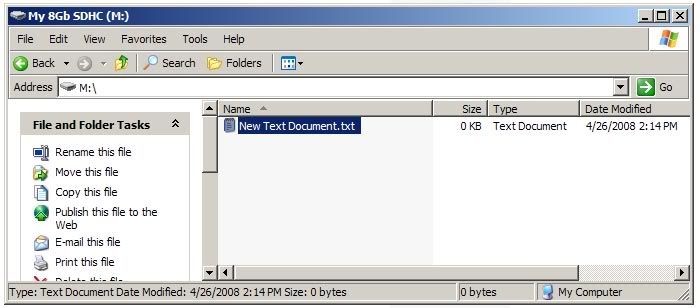
5) A 'New Text Document.txt' file is created.
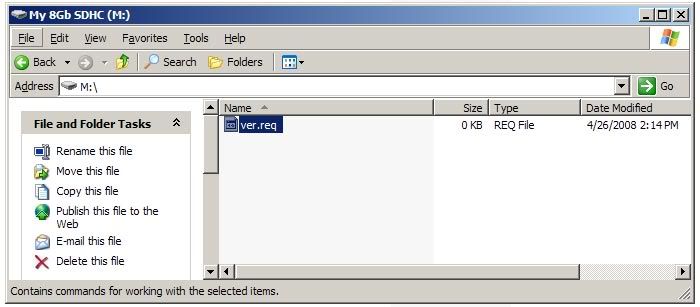
6) Rename the file to 'ver.req' (like how I circled it red in the pic below). A prompt will appear, click on 'yes'.

7) You're done!
8) Now plug in the card into your Canon S5 IS and ** start in 'PLAYBACK MODE' **. After start-up in playback mode, you are presented with the 'no image' screen. (Pardon the blurry pics, took it with my handphone cam)
9) Now, press the SET + DISP. buttons together (press SET first, hold it down, then press DISP). If you did everything right, you will be presented with this screen:
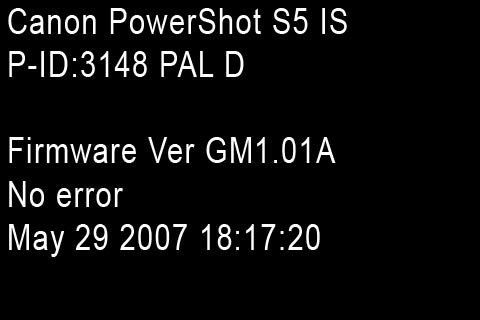
It reads slighty different depending on which version you have:
For 1.01a
P-ID:3148 PAL D
Firmware Ver GM1.01A
No error
May 29 2007 18:17:20
For 1.01b
P-ID:3148 PAL D
Firmware Ver GM1.01B
No error
June 14 2007 20:11:19
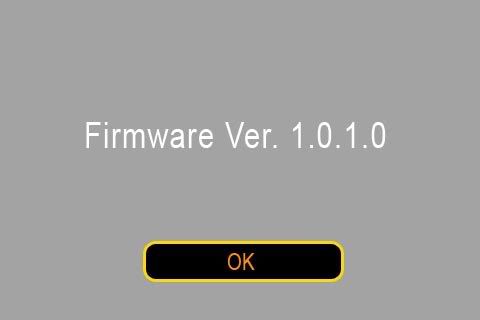
Things that can go wrong here
If you get firmware Ver. 1.0.1.0, you fumbled somewhere! Format your card and start again!
Whew! After all those steps, you finally get to know your Canon S5 IS firmware version! Now we are one step closer!
Step 2: Download the correct CHDK version and Tools
Before begin download these things, I suggest you create a folder to store these files for your own convenient's sake. At least you won't need to search around your cluttered desktop when you need the files. Anyway, I've included a zipped package with all the things that you need. Download it here. Or if you don't trust me ;P, you can download it yourself from each of the respective sites below.
1) Pretty simple step. Just head over to CHDKwiki download page and grab the CHDK version according to your S5 firmware version. And yeah it has to be same, else it won't work.
2) Now go to this CHDK Card tricks forum thread and locate the download link for cardtricks. This nifty little tool written by whim will let you format your card and make it bootable.
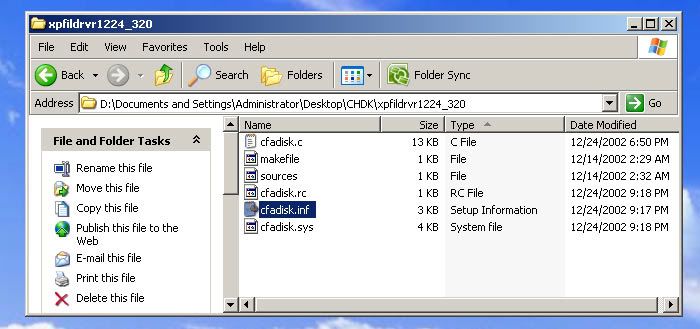
3) Read reply #4 from the CHDK S5 forum thread. You will need this file to make your removable disk a 'permanent disk' so you can partition it. (Anyone know any better way to partition SD/SDHC cards? Please let me know as this is the only way I know). Don't worry if it seems confusing, I will illustrate the steps shortly. There is a link there to download this file: http://www.xpefiles.com/viewtopic.php?t=92. The file name is 'xpfildrvr1224_320.zip'.
Alright, now that's all the files you need to get your card to workin'. Again, you can download this file here which I created with everything you need. Onwards!
Step 3: Make our card into a 'fixed disk' for partitioning
Read up CHDK Card forum « Reply #4 on: 16 / January / 2008, 14:42:27 » posted by lukg. That is the step to make your card from a 'removable media' to a 'permanent disk' so that we can partition it.
** Highly dangerous stunt up ahead! If you are unfamiliar with registry editing and windows drivers, please read through this section first. If you find that you can't understand half of what I wrote, cease operation and seek help from your geek/nerd friend. Or if you must continue, DO A SYSTEM RESTORE POINT first. If anything goes terribly wrong, you can go back to the restore point. You have been warned.**
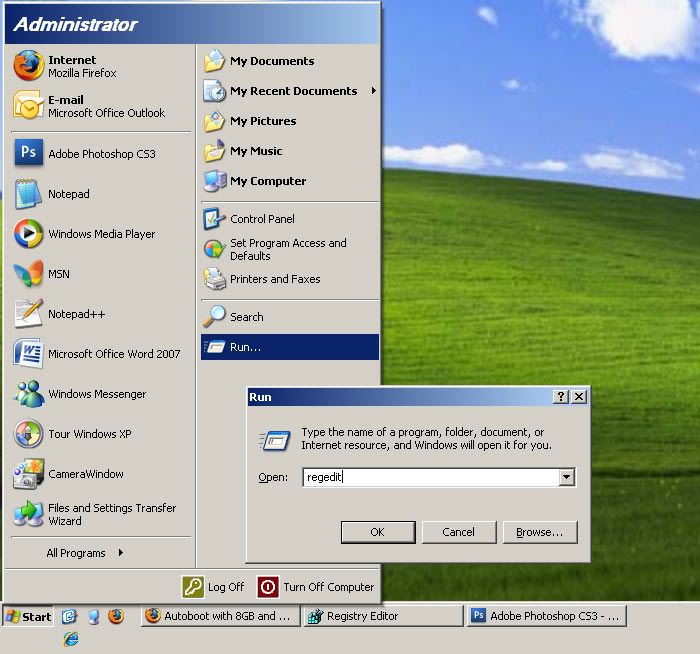
1) Startup registry editor, go to run from the start button, and type 'regedit' and press enter.
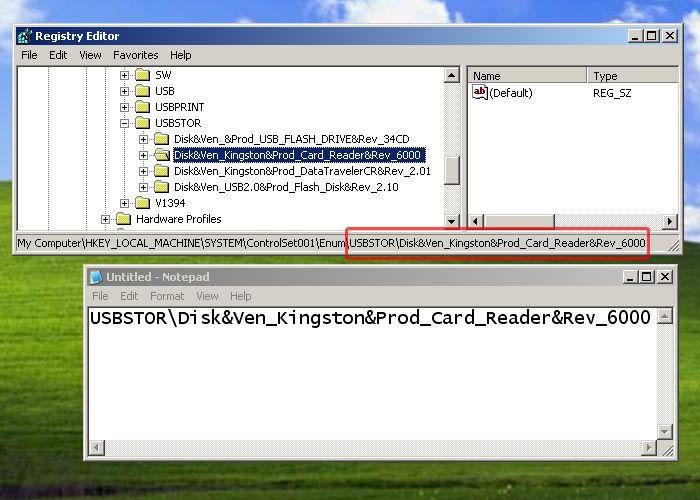
2) After the editor loads, navigate to the following key:
HKEY_LOCAL_MACHINE\SYSTEM\ControlSet001\Enum\USBSTOR\
You will see a couple entries below USBSTOR. These are the removable disk's registry entries.

3) Now locate your card reader. I use a Kingston Data Traveler Reader. Hopefully you will find traces of the card reader name. I poked around the entries and found out that this key refers to my card reader. (In the red squares, click on pic for a larger view).

4) Now copy the name of the key into notepad. For mine, the text that is needed is 'USBSTOR\Disk&Ven_Kingston&Prod_Card_Reader&Rev_6000'. Remember to include the 'USBSTOR\' before the key name. Here is an example of mine:
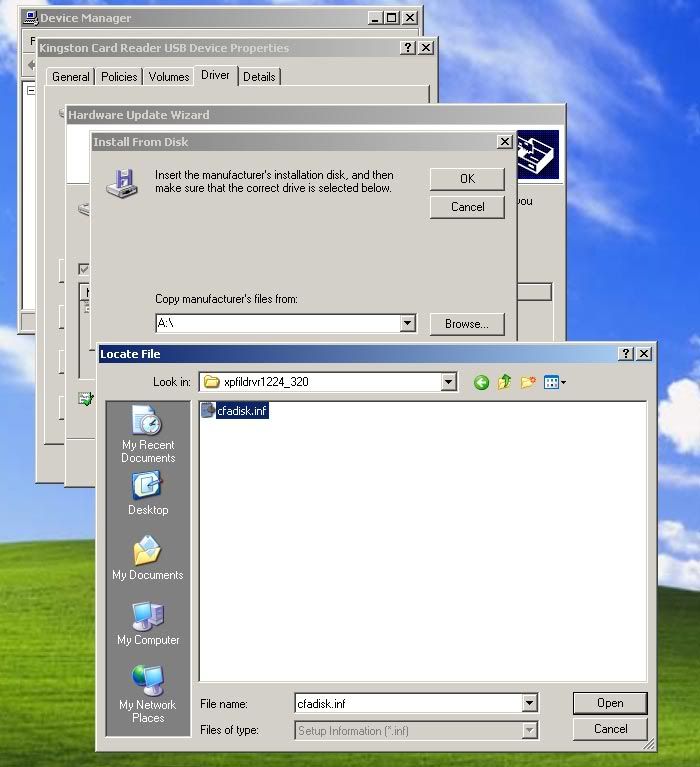
5) Now open up the file 'xpfildrvr1224_320.zip' that you downloaded. It is a zipped file. Extract all the files into a folder. Locate the file 'cfadisk.inf', and open it in notepad.
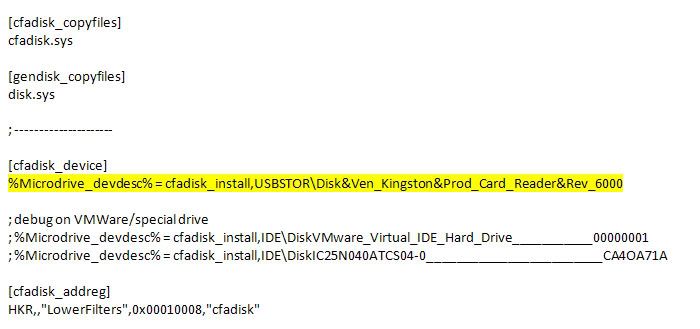
6) Look at the following screenshot for clarification. Scroll down untill you see the line
%Microdrive_devdesc% = cfadisk_install, cfadisk_install,IDE\DiskIBM-DSCM-11000__________________________SC2IC801
Now you need to replace ALL lines "%Microdrive_devdesc% = cfadisk_install, blablabla" with the line you copied from your registry. Here is my example:
%Microdrive_devdesc% = cfadisk_install, USBSTOR\Disk&Ven_Kingston&Prod_Card_Reader&Rev_6000
Change from:

Replace those line highlighted in yellow in the picture above with the line what you copied in step 4. I replaced those lines with 'USBSTOR\Disk&Ven_Kingston&Prod_Card_Reader&Rev_6000' as the following picture shows. ** PAY EXTRA CAREFUL ON WHAT TEXT ARE REPLACED! **
After done, save.
7) ** Plug in your card reader **. Goto Control Panel>System>Device Manager. Under 'Disk Drives', you should see your card reader. Double click your card reader device. A dialog pops up. Go to the 'Dirver' tab, and select 'Update Driver'.
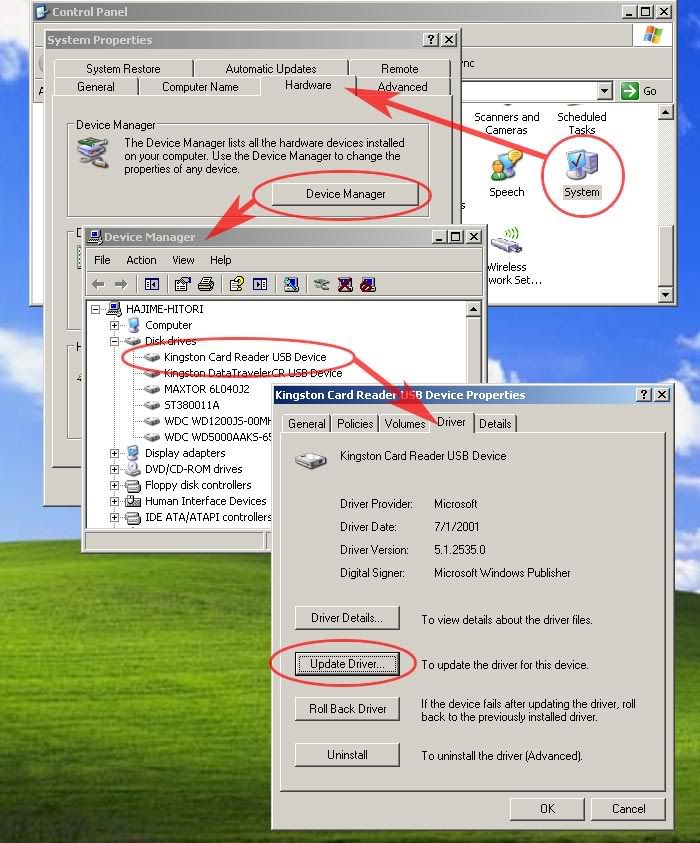
8) When Windows ask to connect to Windows Update to search for software, select 'No, not this time'.
When Windows ask "What do you want the wizard to do?", select 'Install from a list of specific location (Advanced)'.
The 'Hardware Update Wizard' dialog pop up will appear, select 'Don't search. I will choose a driver to install'.
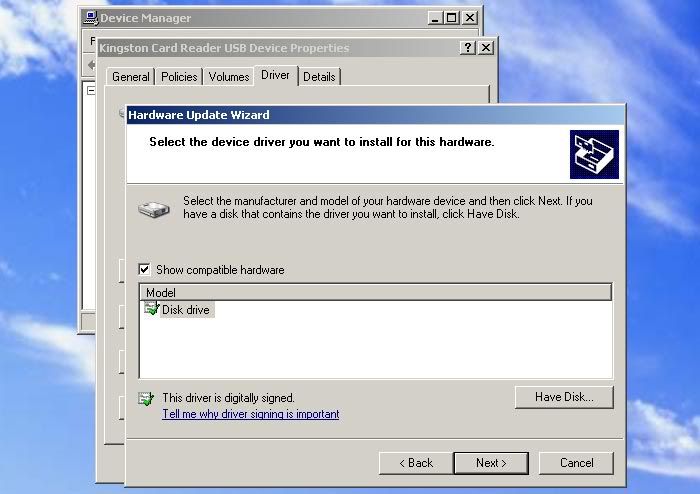
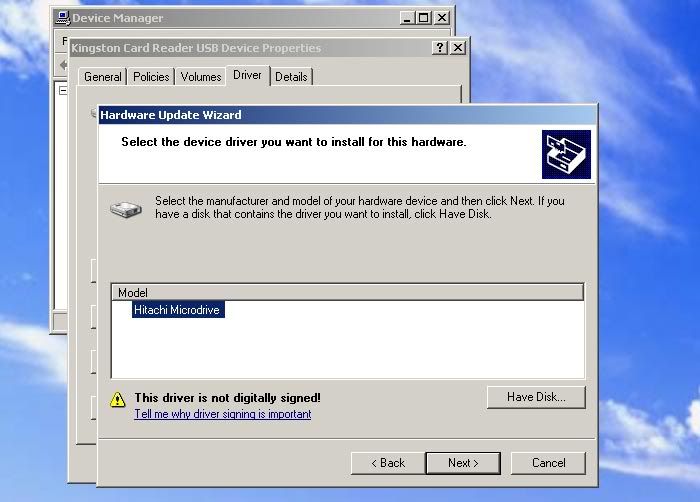
9) Select 'Have Disk', and browse to the modified driver (the file 'cfadisk.inf' that we edit just now.)
10) You will see this dialog. Click 'Next'. Windows will warn you that this driver is not uncertified and gives a whole bunch of warnings. Just continue with the installation.
11) Restart your computer. After you reboot, you will see that your removable drive (card reader) is now a 'Fixed drive'. Yay! Now we can partition and format our card!
Step 4: Partition card
1) Goto Control Panel>Administrative Tools>Computer Management, on the side bar. Locate 'Disk Management' and select it. You will be presented with a screen as below. Notice that my 'converted' SDHC is listed (in the red boxes).
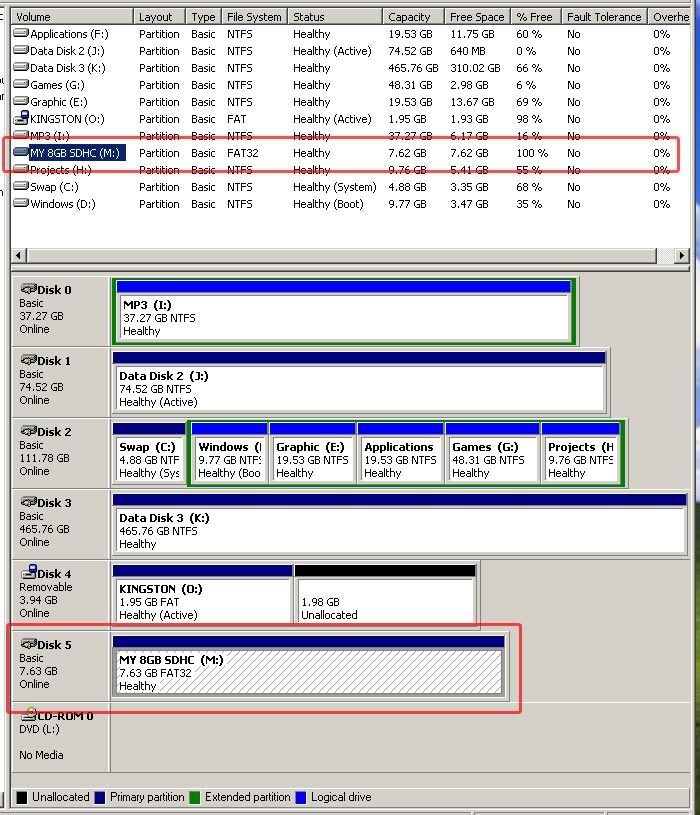
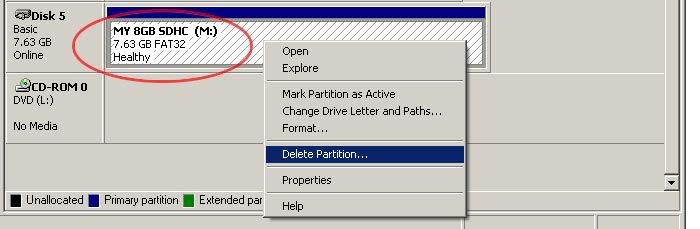
2) There should be an existing 8Gb partition there. So delete that by right clicking on the card partition, and selecting 'Delete'. Make sure you are right clicking on the correct partition! Else you risk deleting your harddisk partition which cannot be undone!
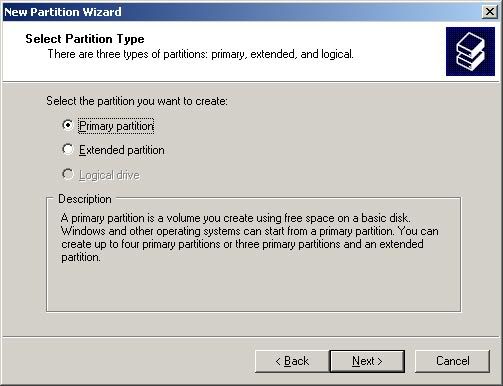
3) Your card partition will be showing 'Unallocated'. So now we are going to create the FAT16 partition for booting CHDK. Right click on the empty partition and select 'New partition...'

4) Create a primary partition.
5) Allow 16Mb for that partition. (Theoratically can be any size u wan, but who wants to waste more space for it?)

6) Assign a drive letter, this drive letter will be used when u plug your card reader in.
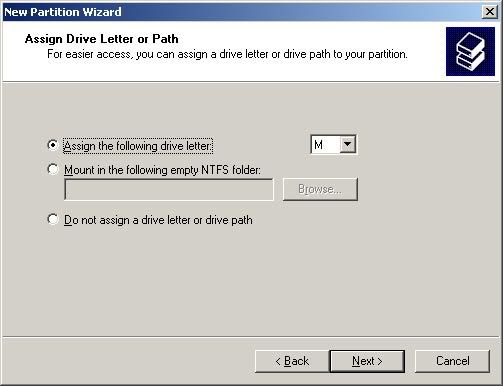
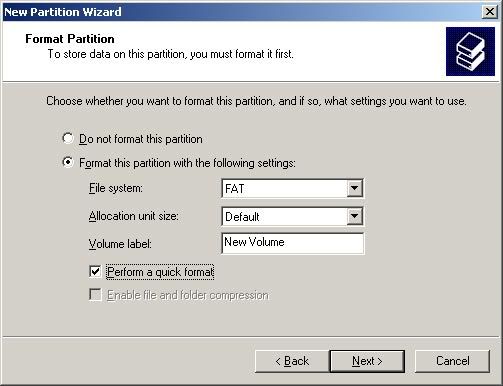
7) Format it as FAT and allow a quick format.
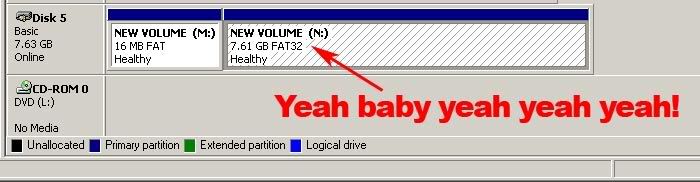
8) Done! Our FAT16 partition for CHDK! Yeah baby yeah!

9) Now for the other partition. Do these steps:
i) Create new partition.
ii) Create primary partition.
iii) Allocate the maximum size.
vi) Assign a drive letter, used by windows when card is plugged in.
v) Format as FAT32!

10) Partition success!
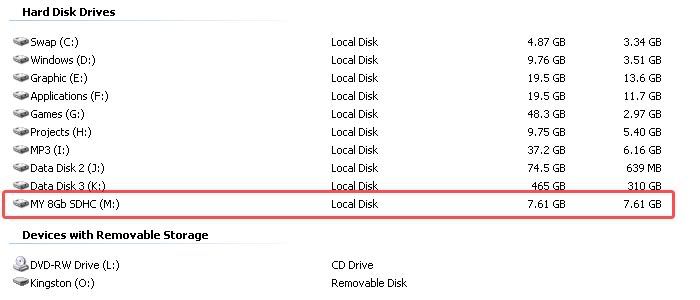
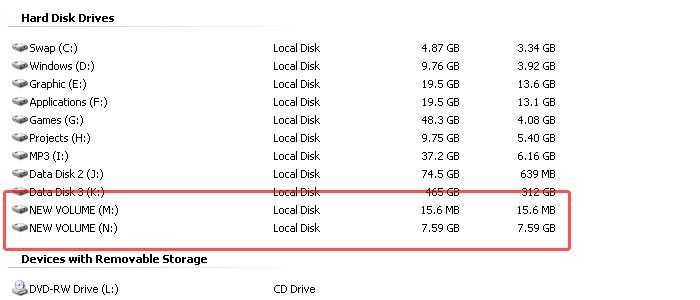
My Computer view once you succeed:
Step 5: Make card bootable
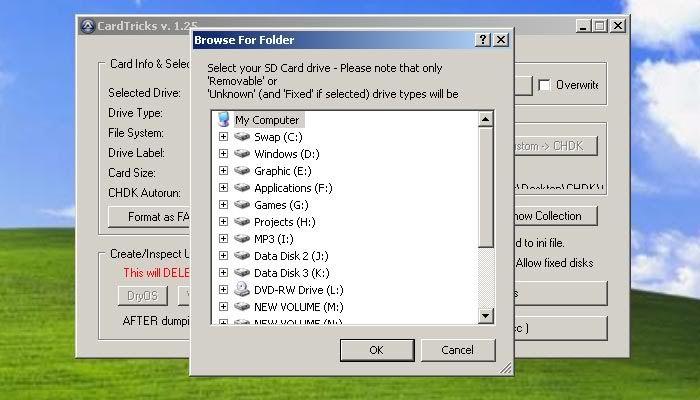
1) Startup 'cardtricks that you downloaded just now. You will be presented with a 'Browse for folder' dialog. Select 'Cancel'.
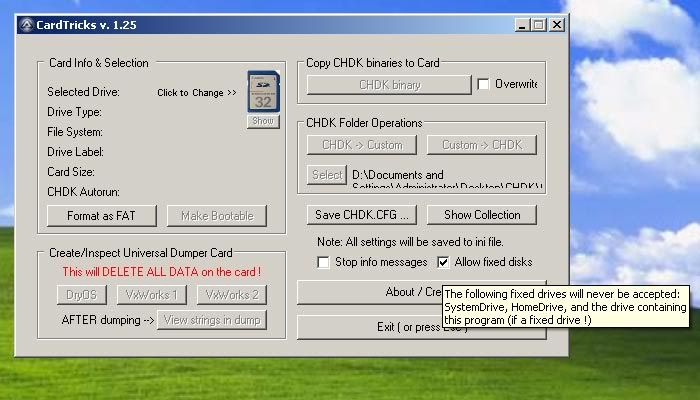
2) Now the 'Allow fixed disk' is unchecked by default. Check it.
3) Click on the SD card icon to bring up the 'Browse for folder' dialog. Now remember our FAT16 partition is drive M? So select drive M and hit 'OK'.

4) The 'Make Bootable' button becomes enabled. Click on it!
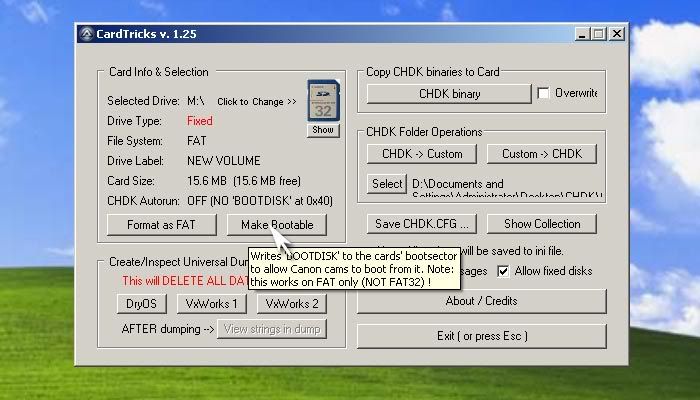
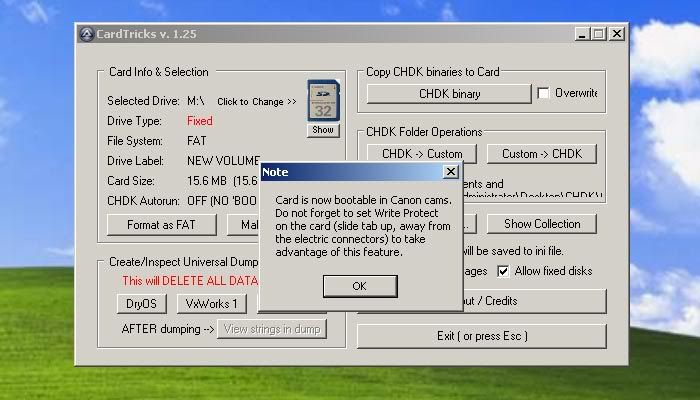
5) Booyah, the card is now bootable!
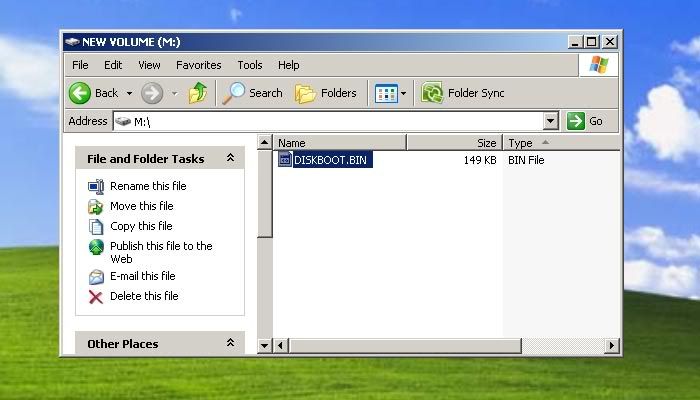
6) Whats left is just to copy the CHDK (DISKBOOT.bin) into our bootable drive.
Step 6: Voila! CHDK on high capacity SD/SDHCs!
To enable CHDK, lock the card. The camera will boot CHDK.
To resume 'normal' operation (without CHDK), simply unlock the card. The camera will not boot CHDK.
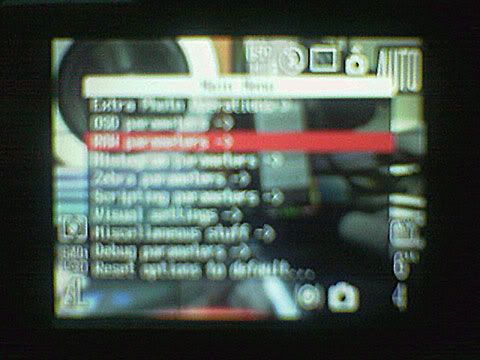
WTF is this? Tat's CHDK on S5, LOL. Sorry taken with my phone camera...
Appendix A: To do
I read in the forums from DataGhost that if we make the FAT12/FAT16 an extended drive, Windows will ignore it and read the next main partition which will be the FAT32 partition (where all the photos are stored).
Currently I still can't 'change' the FAT12/FAT16 partition to be 'extended'. Doing so in the windows disk management don't seem to work as camera will show disk error. So I'm thinking mayb need to hack the partition table of the FAT12/FAT16... which I'm still figuring how to do.
Well, if it works, I assume that the card can then be used on ANY computer, irregardless of whether the custom driver is installed or not... I think.
Appendix B: Credits
Creators and owners of resources used in this tutorial:
Dataghost from the CHDK forums for porting over CHDK to S5, and a lot of info for booting SDHC.
whim THX for creating the neat tool card tricks.
lukg from the CHDK forums for pointing out the custom driver hack.
All the people who have contributed to the CHDK forum postings, I learned alot!
* Did I miss anyone? Or should someone be included? Let me know, lol.

